
[컴포넌트 스캔과 의존관계]
앞서서 살펴본 @Bean을 사용한 의존관계 설정과 우리의 순수한 자바코드로 의존관계를 설정해주는 것은 매우 번거로운 일이었다. (실무에서는 이런 작업을 몇백개씩을 해야 하니까)
우리는 이를 조금 더쉽게 하고자 컴포넌트스캔과 컴포넌트 그리고 @Autowired를 사용해서 의존관계를 자동으로 주입하고 이게 어떻게 가능한 일인지를 살펴보고자한다.
- @ComponentScan
- 설정 정보 없이도 자동으로 스프링 빈 등록을 돕는다.
- Autowired
- 의존관계를 자동으로 주입해준다.
- 생성자 위에 붙여주면 된다.
생성자란?
객체 생성 시 항상 실행되는 것으로, 객체 초기화에 사용되고 반환(return)이 없어도 되는 메소드이다. 또한 맨처음 실행되는 메소드이다.
[ComponentScan 사용]
package hello.core;

import org.springframework.context.annotation.ComponentScan;
import org.springframework.context.annotation.Configuration;
import org.springframework.context.annotation.FilterType;

@Configuration
@ComponentScan(
        //AppConfig가 자동스캔 대상이 되지 않게 빼주는 작업.
        excludeFilters = @ComponentScan.Filter(type= FilterType.ANNOTATION,classes = Configuration.class)
)
public class AutoAppConfig {


}
우리는 기존 순수 자바코드로 이루어진 설정 정보인 AppConfig를 사용해서 설정정보를 관리했다.
그러나 ComponentScan을 사용하면 @Autowired가 생성자를 이용해 스프링 빈에 자동으로 등록해주기 때문에 직접 코드를 다 구현하는 번거로움이 사라지게 된다.
[@Component와 @Autowired 사용]
package hello.core.discount;

import hello.core.member.Grade;
import hello.core.member.Member;
import org.springframework.stereotype.Component;

@Component
public class RateDiscountPolicy implements DiscountPolicy{

    private int discountPercent = 10;
    @Override
    public int discount(Member member, int price) {
        if (member.getGrade()== Grade.VIP){
            return price * discountPercent/100;
        } else{
            return 0;
        }

    }
}
package hello.core.member;
import org.springframework.beans.factory.annotation.Autowired;
import org.springframework.stereotype.Component;
@Component
//관례상 구현체가 1개인 경우엔 이름뒤에 Impl를 쓴다,.
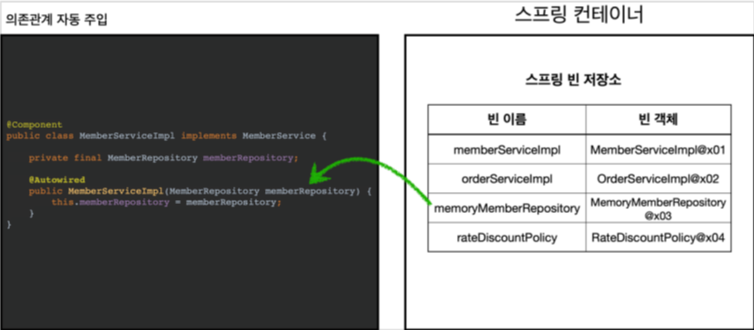
public class MemberServiceImpl implements MemberService{
private final MemberRepository memberRepository;
@Autowired
public MemberServiceImpl(MemberRepository memberRepository) {
this.memberRepository = memberRepository;
}
@Override
public void join(Member member) {
memberRepository.save(member);
}
@Override
public Member findMember(Long memberId) {
return memberRepository.findById(memberId);
}
//테스트 용도
public MemberRepository getMemberRepository(){
return memberRepository;
}
}
- 이전에 AppConfig에서는 @Bean 으로 직접 설정 정보를 작성했고, 의존관계도 직접 명시했다. 이제는 이런 설정 정보 자체가 없기 때문에, 의존관계 주입도 이 클래스 안에서 해결해야 한다.
- @Autowired 는 의존관계를 자동으로 주입해준다. 자세한 룰은 조금 뒤에 설명하겠다
[의존관계 주입 동작]


[탐색 위치와 기본 스캔 대상]
탐색할 패키지의 시작 위치를 지정하는 이유는?
모든 자바 클래스를 다 컴포넌트 스캔하게 되면 시간이 오래걸리게 된다. 그래서 꼭 필요한 위치부터 탐색할 수 있게 시작 위치를 지정할 수 있다.
package hello.core;

import org.springframework.context.annotation.ComponentScan;
import org.springframework.context.annotation.Configuration;
import org.springframework.context.annotation.FilterType;

@Configuration
@ComponentScan(
        basePackages = "hello.core",
        //AppConfig가 자동스캔 대상이 되지 않게 빼주는 작업.
        excludeFilters = @ComponentScan.Filter(type= FilterType.ANNOTATION,classes = Configuration.class)
)
public class AutoAppConfig {


}
권장하는 방법
설정 정보 클래스의 위치를 프로젝트 최상단에 두는 것을 권장하고 최근 스프링부트 역시 이 방법을 기본으로 제공한다.
컴포넌트 스캔 기본 대상
컴포넌트 스캔은 @Component 뿐만 아니라 다음과 내용도 추가로 대상에 포함한다.
- @Component : 컴포넌트 스캔에서 사용
- @Controlller : 스프링 MVC 컨트롤러에서 사용
- @Service : 스프링 비즈니스 로직에서 사용
- @Repository : 스프링 데이터 접근 계층에서 사용
- @Configuration : 스프링 설정 정보에서 사용
참고
애노테이션에는 상속관계라는 것이 없다. 그래서 이렇게 애노테이션이 특정 애노테이션을 들고 있는 것을 인식할 수 있는 것은 자바 언어가 지원하는 기능이 아니고 스프링이 자체적으로 지원하는 기능이다!
[중복 등록과 충돌]
컴포넌트 스캔에서 같은 빈 이름을 등록하면 어떻게 될까?
- 자동 빈 등록 VS 자동 빈 등록
- 컴포넌트 스캔에 의해 자동으로 스프링 빈이 등록되는데, 그 이름이 같은 경우 스프링은 오류를 발생시킨다.
- ConflictingBeanDefinitionException 예외 발생
- 수동 빈 등록 VS 자동 빈 등록
- 이 경우에는 수동 빈 등록이 우선권을 가진다.
- 수동 빈이 자동 빈을 오버라이딩 해버린다.
수동 빈 등록시 남는 로그
Overriding bean definition for bean 'memoryMemberRepository' with a different definition: replacing
[출처]
'Back-End > Spring' 카테고리의 다른 글
| [Spring][스프링 기본편] - 21. 옵션 처리(의존관계 주입) (0) | 2022.01.28 |
|---|---|
| [Spring][스프링 기본편] - 20. 의존관계 주입 (0) | 2022.01.28 |
| [Spring][스프링 기본편] - 18. @Configuration과 싱글톤 (0) | 2022.01.26 |
| [Spring][스프링 기본편] - 17. 싱글톤 방식의 주의점 (0) | 2022.01.26 |
| [Spring][스프링 기본편] - 16. 싱글톤 컨테이너 (0) | 2022.01.26 |